Posted by Absolute Digitizing
Filed in General Health 157 views
You have a cool design. Maybe a company logo, a team mascot, or a fun quote. You want to stitch it onto a baseball cap, a denim jacket, or the front of a hoodie. You save your image as a JPG, send it to your embroidery machine, and... nothing happens. Or worse, the machine tries to run it and produces a tangled mess of thread.
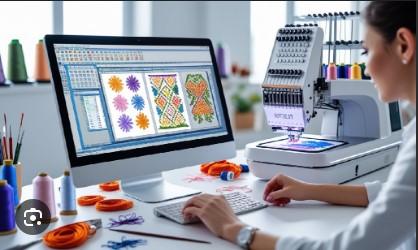
Here is the hard truth. Embroidery machines do not read JPG files. They read stitch files. The most common format for commercial embroidery is DST. So if you want to embroider anything, you need to Convert JPG to DST first. That process is called digitizing. And no, you do not need to spend five hundred dollars on software or hire a specialist at eighty bucks an hour. I will show you affordable, practical ways to get your JPG or PNG ready for hats, shirts, and jackets without losing your mind or your budget.
Before we jump into the how, let me explain why this matters. A JPG is a grid of colored pixels. Your computer screen shows it fine. An embroidery machine is a completely different beast. It follows a path of stitches—needle penetrations, thread colors, underlay stitches, pull compensation, and trims. DST is the instruction manual for that path.
You cannot just push a button and magically turn pixels into perfect stitches. The conversion process requires interpretation. A good digitizer decides where to put a satin stitch, where to use a tatami fill, and how to handle tight corners. The affordable methods I will share today handle some of that thinking for you, while others let you control every last stitch.
Auto-digitizing software takes your JPG and automatically generates a DST file. The quality varies wildly. For simple designs with large, solid shapes and few colors, auto-digitizing works surprisingly well. Think block letters, basic geometric logos, or chunky cartoon characters.
One of the most affordable options is Ink/Stitch. This is a free, open-source plugin for Inkscape (which is also free). Install Inkscape, add the Ink/Stitch extension, and you get a surprisingly powerful digitizing tool. Import your JPG, trace it manually or use the auto-trace feature, then assign stitch types. Ink/Stitch lets you output a DST file directly. The learning curve is steep, but the price is unbeatable.
Another budget choice is EmbroideryWare’s free online converter. Upload your JPG, choose your desired stitch density, and download a DST. It works best on black and white designs. Color gradients confuse it badly. Keep your source image simple, high contrast, and no smaller than 300 pixels per inch.
If you plan to digitize more than a few designs, invest in a one-time purchase program. Cheap monthly subscriptions add up fast. Look for software like SewArt (around 65)orEmbird(basicmodulearound100, but often goes on sale). These programs load your JPG and provide auto-digitizing wizards. You can then manually edit the stitch paths, change stitch angles, and add underlay.
I personally like SewArt for beginners. The interface looks dated, but the auto-digitizing feature delivers clean DST files for hat logos and shirt designs. It handles up to 16 colors and lets you preview the stitch simulation before you save. No subscription fees. Pay once, use it forever.
For jackets, which often use heavier fabrics and thicker threads, you want control over pull compensation. That means the software needs manual editing tools. SewArt and Embird both offer that. You can nudge stitch points, increase stitch length for loose fabrics, or tighten it for caps with structured fronts.
Maybe you only need to convert one JPG to DST. Buying software feels like overkill. In that case, use a pay-per-design online service. Websites like DigitizeIt, VectorEmbroider, or EmbroideryOnline charge between two and ten dollars per file. You upload your JPG, choose the fabric type (hat, shirt, jacket, or sweatshirt), select your hoop size, and they email you a DST file within a few hours or by the next day.
This is my favorite affordable method for single projects. For eight dollars, you get a professional-level digitizing job from someone who knows how to adjust stitch density for a structured cap versus a stretchy t-shirt. Hats need shorter stitches and tighter pull compensation because the curved surface distorts longer stitches. Jackets, especially heavy canvas or denim, need wider underlay stitches to keep the design from sinking into the thick fabric. A good online service asks these questions and tweaks the DST accordingly.
Just read reviews before you buy. Some cheap services use automated software and call it manual digitizing. Look for services that show before-and-after photos and mention specific fabric adjustments.
Similar to the pay-per-design websites, you can find individual digitizers on Fiverr or Upwork. Prices start at five dollars for simple logos and go up to twenty dollars for complex designs with lots of color changes. The advantage here is communication. You message the digitizer, tell them your fabric type, and request a DST file with specific dimensions. They send a proof, you approve or ask for changes, then you get the final DST.
For hats, ask for a file with a maximum height of 2.5 inches unless you have a large cap hoop. For shirts, ask for a light underlay so the fabric does not pucker. For jackets, request a heavier underlay and longer stitch lengths. Good digitizers know these settings. Bad ones just run an auto-digitizer and collect your five bucks. Look for gigs with hundreds of five-star reviews and sample DST files from past hat or jacket projects.
No matter which method you choose, start with a clean JPG. Remove any background. Crop tight around your design. Reduce the number of colors—embroidery machines handle four to seven colors best. Convert gradients to solid blocks of color. Scale your image to the actual final embroidery size. A three-inch design digitizes differently than a six-inch design. Smaller designs need fewer details. Remove tiny text (under 0.25 inches tall) because needles cannot sew that small.
Also, save your JPG at 300 DPI. Low resolution images force the digitizing software to guess where edges belong. Guesses lead to jagged stitch files that look terrible on a shirt or hat.
Let me save you some wasted thread and frustration. Do not use the same DST file for a cap and a hoodie. The fabrics stretch and curve differently. A design that lies flat on a cotton t-shirt will distort on the curved front of a baseball cap. You need separate digitizing settings for each garment type.
Also, do not forget about backing material. The DST file includes stitch density settings. Dense stitches on a stretchy shirt without proper backing will cause puckering. Your digitizer or software should ask about backing type. If it does not, add that information manually.
Finally, avoid tiny details. What looks crisp on a JPG often turns into a thread blob on fabric. Simplify your design before you convert. Bold outlines, large text, and simple shapes always beat intricate details in embroidery.
Turning a flat JPG into a stitched DST file for hats, shirts, and jackets sounds technical. But you have real, affordable paths forward. Start with free auto-digitizing using Ink/Stitch if you enjoy learning new tools. Use a pay-per-design website for a one-off project. Or hire a five-dollar freelancer on Fiverr to handle the fabric-specific details for you.
The key takeaway is this: you only need to Convert JPG to DST properly once for each design and garment type. Save that master DST file. Then you can stitch it onto a hundred hats or fifty jackets with repeatable, professional results. No more pixelated messes. No more machine errors. Just clean, durable embroidery that looks exactly how you imagined. Pick one affordable method from this guide, prep your JPG carefully, and get that design onto your cap, shirt, or jacket today.